Delta Force: Winning Strategies and Gameplay Guide
Operations mode in Delta Force, also known as Hazard Operations or Extraction mode, is the epicenter of the game's high-stakes action. Whether you refer to it as Operations or simply "raiding," the core concept remains consistent—parachute into the map, secure valuable gear, and extract successfully before being eliminated by other players or AI enemies. A crucial element of this mode is the risk factor; everything you bring into the game is at stake, and losing a fight means losing your gear.
This comprehensive guide delves deeper than mere survival tactics. Here, you'll uncover the intricacies of how Operation mode functions from start to finish, including strategies on pacing your run, managing your inventory, and making intelligent decisions to maximize your gains over time. For those solely interested in survival tips, our dedicated blog features a detailed guide on the subject.
Whether you're venturing solo or teaming up with a squad, a thorough understanding of the system is essential for playing smarter, not harder.
What Operations Mode Actually Is
Delta Force's Operations mode is a dynamic PvPvE sandbox where every match offers a unique experience. You and up to two teammates enter a live map teeming with AI soldiers, scattered loot, and rival teams. The objective is to collect as much loot as possible and safely extract before you're taken down by threats, human or otherwise.
Unlike typical shooter modes, there's no score to pursue. What you manage to extract directly contributes to your inventory outside the raid. Conversely, death means losing everything you're carrying, with the exception of items secured in your Safe Box. This risk-and-reward dynamic is what injects Operations mode with its thrilling intensity, even if you're just scavenging for medical supplies and making a stealthy exit.
Loadout Planning and Inventory Control
Your journey to success begins before you even set foot on the map—with meticulous loadout planning. Every entry into a match incurs a cost, so selecting the optimal loadout is crucial. Essential gear such as a helmet, armor, chest rig, and backpack are mandatory for deployment. However, your choices beyond these basics will dictate your approach to the game.
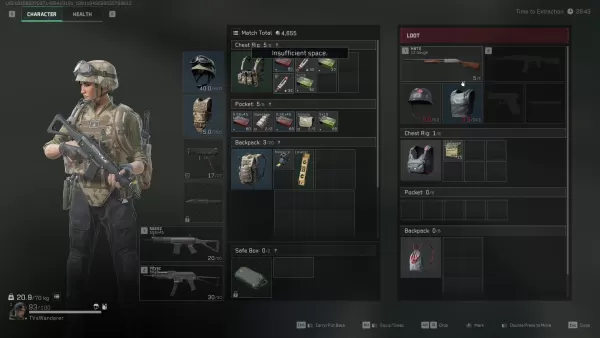
Extraction zones are generally fixed, though some maps feature dynamic elements like elevators or enemy-controlled checkpoints. Always have an exit strategy in mind before diving deep into looting.
Loot Smarter, Not Harder
Every item in Operations mode carries a sell value, but not all are worth the risk. Initially, focus on acquiring healing items, weapon attachments, and rare electronics—these are small, valuable, and can be safely stored in your Safe Box if necessary.
While heavy weapons and armor may be tempting, they can hinder your mobility and occupy valuable space. Carry them only if you're certain of extraction or if you're close to an exit with nothing left to lose.
A smart tip for newcomers is to steer clear of high-traffic loot areas in the early minutes. Allow other teams to clash, then swoop in to claim the spoils. If playing solo, loot the map's perimeter and revisit areas later. You'll often find valuable items left behind after intense team battles.
Picking the Right Operative
Your choice of Operative shapes your strategy in Operations mode. Not all Operatives are suited for stealth or loot-focused gameplay, so select one that aligns with your objectives.
Operatives like Luna and Hackclaw excel in intelligence gathering and mobility. Luna can tag enemies and disrupt advances with her shock arrows, while Hackclaw moves silently and can execute stealthy takedowns with her knife. Stinger's healing capabilities make him invaluable for team runs, particularly when supporting more aggressive players.
Steer clear of Operatives with loud or conspicuous abilities unless your goal is to engage in combat. Characters like D-Wolf are entertaining but draw too much attention in a mode where staying under the radar often yields better outcomes.
Fight When It Matters
In Operations mode, choosing your battles wisely is more critical than winning them. While PvP engagements can yield gear and XP, they can also slow you down and alert others to your presence. Only fight when necessary or when it's the most advantageous course of action.
Should you find yourself in a firefight, constantly reposition and aim for quick resolutions. Utilize your abilities to gain an edge—Luna's detection arrow can reveal enemies hiding behind cover, and Stinger's smoke grenades can provide cover to heal or escape.
Remember, you can always loot the fallen later. If two teams are engaged in combat, hold back and let them exhaust each other. Third-partying is risky but one of the most effective ways to acquire gear without needing to outgun everyone.
Making the Most of Each Match
Every raid is an opportunity to accumulate value, hone your skills, or gain new insights. Don't dwell on a poor run—instead, use it to refine your strategy for the next one.
Conserve your credits during a losing streak and play more strategically when on a winning run. Upgrade your Safe Box as early as possible, experiment with different Operative setups, and familiarize yourself with the maps to discover the most lucrative loot routes.
Over time, your focus will shift from mere survival to optimization, which is when Operations mode becomes truly engaging.
Delta Force's Operations mode transcends simple loot-and-run mechanics. It's a game of calculated risks, meticulous planning, and astute decision-making. Craft your loadout with intention, loot judiciously, and know when to engage or retreat. And remember, every setback is merely part of the journey that makes your eventual triumphs even sweeter.
For the ultimate gaming experience, consider playing Delta Force on a PC using BlueStacks. Enjoy faster load times, precise control, and seamless inventory management. It's the ideal way to stay competitive as you master the intricacies of Operations mode.
-
 RuneScape: Dragonwilds’ upcoming update addresses Velgar’s meteor attacks. Learn what’s coming in patch 0.7.3 and what’s next for the developers.RuneScape: Dragonwilds 0.7.3 Patch NotesVelgar Meteor Fix and Cloud SavesIt’s been several weeks since RuAuthor : Jack May 03,2026
 -
 FromSoftware has revealed The Duskbloods, an upcoming game for the Nintendo Switch 2! Stay informed with the latest news and updates about the game here.← Back to The Duskbloods main articleThe Duskbloods News2025February 6 ⚫︎ FromSoftware announcedAuthor : Elijah May 03,2026
-
 MEGA JACKPOT SLOTS: Wild Vegas Slot MachineDownload
 -
 Welcome to the Parallel World!Download
 -
 This is the Awahime Academy Cultural Festival!Download
 -
 RWBY Rise Of The White FangDownload
 -
 Wedding Fashion Makeup DressupDownload
 -
 Banana Trainer Vol.2Download
 -
 Idle Workout Master: MMA heroDownload
 -
 Monster Girl 1000Download
 -
 3001: A MILF OdysseyDownload
 -
 Hail To The KingDownload


![Taffy Tales [v1.07.3a]](https://imgs.ehr99.com/uploads/32/1719554710667e529623764.jpg)


- Black Ops 6 Zombies: How To Configure The Summoning Circle Rings on Citadelle Des Morts
- Roblox: Latest DOORS Codes Released!
- Harvest Moon: Lost Valley DLC and Preorder Details Revealed
- Silent Hill 2 Remake Coming to Xbox and Switch in 2025
- Roblox: Blox Fruits Codes (January 2025)
- Roblox: Freeze for UGC Codes (January 2025)